Concrete driveways offer unmatched durability and design versatility for Long Island homes. Discover how professional installation protects your investment against NY winters while transforming your property's curb appeal.
Share:

Summary:
Long Island winters test every driveway material to its breaking point. Freeze-thaw cycles—where water seeps into cracks, freezes overnight, expands, and creates larger cracks—repeat dozens of times each winter. This process destroys asphalt driveways within 15-20 years, sometimes sooner if installation wasn’t done right.
Concrete handles this differently. When properly installed with the right thickness, reinforcement, and base preparation, concrete driveways last 30-40 years in Suffolk County. Some well-maintained installations exceed 50 years. That longevity comes from concrete’s structural properties and how it’s engineered to handle the specific stresses our climate creates.
The cost difference tells an interesting story. Asphalt costs $5-9 per square foot installed, while concrete runs $7-14 per square foot. But asphalt needs resealing every 3-5 years at $1-2 per square foot, plus crack repairs, and eventual complete replacement. Concrete requires occasional cleaning and sealing every few years, but the maintenance burden is significantly lower over its lifespan.
Water is your driveway’s biggest enemy in Nassau County and Suffolk County. When moisture penetrates the surface and reaches the base layer, freezing temperatures turn that water into ice. Ice expands with tremendous force—enough to crack concrete, buckle asphalt, and shift paver stones.
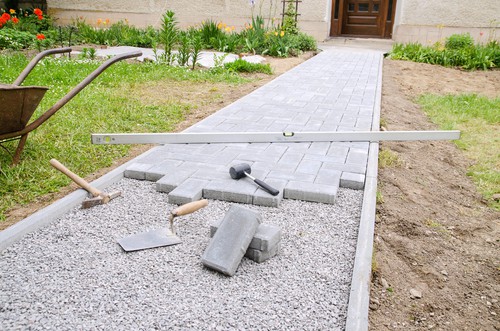
Concrete’s advantage comes from proper installation techniques that residential masonry contractors use. The process starts 8-12 inches below the surface with excavation that removes unstable soil. A compacted gravel base provides drainage and prevents water from pooling beneath the slab. This base layer is critical—shortcuts here lead to settling, cracking, and premature failure regardless of what material sits on top.
Thickness matters more than most homeowners realize. A 4-inch concrete slab is standard, but increasing to 5 inches adds roughly 50% more load-bearing capacity for only 20% more cost. For driveways that will see heavy vehicles or harsh conditions, that extra inch makes the difference between a driveway that lasts and one that needs premature replacement.
Reinforcement prevents catastrophic failure. Steel rebar or wire mesh doesn’t stop cracks from forming—concrete will crack as it cures and settles. But reinforcement holds those cracks together, preventing them from spreading and keeping the surface stable. Modern installations also use fiber reinforcement mixed into the concrete itself, which reduces shrinkage cracks during the curing process.
The finishing process affects durability too. Overworking the surface or finishing while water bleeds to the top weakens the concrete. Professional driveway installers know to wait for the right moment, use proper tools, and apply finishes that improve traction without compromising strength. A broom finish works well for Long Island driveways—it provides grip in winter without creating surfaces that trap water.
Drainage design prevents the water problems that destroy driveways. Your driveway should slope toward the street at least 1/8 inch per foot, directing water away from your foundation and preventing pooling. Some properties need additional drainage solutions like channel drains or permeable base materials. A masonry company with local experience knows how to read your property and design drainage that actually works.
You can find contractors who’ll pour a cement driveway for $5 per square foot. You can also find ones who charge $12-14. The difference isn’t profit margin—it’s what happens beneath the surface and how much experience the crew brings to site-specific challenges.
Soil conditions vary significantly across Long Island. Clay soils in some areas require different base preparation than sandy soils in others. Coastal properties deal with higher water tables. Properties with mature trees face root infiltration issues. A driveway paving contractor who’s worked extensively in Suffolk County recognizes these variables and adjusts the installation accordingly.
Base preparation separates professional work from amateur jobs. The excavation depth must account for your specific soil type and drainage needs. The gravel base needs proper compaction—not just spread and smoothed, but mechanically compacted in layers to create a stable foundation. Shortcuts here save a few hours of labor but guarantee problems within a few years.
Concrete mix specifications matter. A standard 3000 PSI mix works for light residential use, but 4000-5000 PSI concrete provides better durability for Long Island conditions. The mix design should include air entrainment for freeze-thaw resistance and the right water-cement ratio to prevent excessive cracking. Professional concrete driveway contractors specify these details upfront rather than accepting whatever the concrete plant sends.
The curing process requires patience that budget contractors often skip. Concrete needs seven days minimum before you drive on it, and ideally a full month before heavy vehicles or parking large trucks. During this time, the surface should stay moist—not wet, but damp enough that the concrete cures properly rather than drying too quickly. Rushing this process reduces the final strength by up to 50%.
Expansion joints and control joints are planned, not random. These joints control where cracks form, keeping them straight and manageable rather than letting them wander across your driveway in ugly patterns. Joints should be placed where the driveway meets existing structures, at regular intervals across the slab, and at points where thickness changes. A written jointing plan should be part of your contractor’s proposal.
Understanding what happens during installation helps you evaluate contractors and recognize quality work. The process typically takes several days for excavation and preparation, one day for the concrete pour, and then 7-30 days for curing depending on your specific use needs.
Site preparation starts with marking boundaries and locating underground utilities. Nothing ruins a project faster than hitting a water line or electrical conduit during excavation. Professional residential masonry contractors contact utility location services and verify all underground obstacles before equipment arrives.
Excavation removes 8-12 inches of soil across the entire driveway footprint. This depth accommodates the gravel base and concrete thickness while maintaining proper grade relative to your garage floor and street level. The excavated area should extend slightly beyond the final driveway dimensions to allow for formwork and edge details.

The base layer determines whether your driveway lasts 15 years or 40. A 4-6 inch layer of crushed stone gets spread across the excavated area, then compacted with a plate compactor or roller. This isn’t optional—loose gravel compresses under the concrete’s weight, leading to settling and cracking.
Proper compaction happens in layers. Spread 2-3 inches of gravel, compact it thoroughly, then add another layer and compact again. The base should be firm enough that you don’t leave footprints when walking across it. Some contractors test compaction with a proof roller or density gauge to verify the base meets engineering specifications.
Drainage considerations get built into the base. If your property has poor drainage or high water tables, the base might include perforated drain pipes that collect water and direct it away from the driveway. Some installations use a geotextile fabric between the soil and gravel to prevent mixing and maintain separation.
Formwork defines your driveway’s shape and contains the wet concrete during pouring. Wooden or metal forms get staked securely along the perimeter, following the planned slope and curve. The forms must be level with each other and properly aligned—any mistakes here show up permanently in your finished driveway.
Edge details matter for both function and appearance. Some driveways use thickened edges—adding an extra 1-2 inches of concrete thickness around the perimeter where vehicles are most likely to drive on and off. This reinforced edge prevents the most common failure point where driveways crack and crumble at the sides.
Reinforcement gets positioned before the pour. Steel rebar in a grid pattern with 12-18 inch spacing provides structural strength. Wire mesh offers similar benefits with easier installation. The reinforcement needs to sit in the middle third of the concrete thickness, not on the bottom, so contractors use small blocks or chairs to elevate it properly. Modern installations often add synthetic fibers mixed into the concrete for additional crack resistance.
Pour day requires coordination and speed. Concrete trucks arrive on schedule, and the crew must place, level, and finish the concrete before it begins setting. This time pressure is why experienced driveway installers are worth their cost—they know how to work efficiently without compromising quality.
The concrete gets poured starting from the farthest point and working toward the street. Workers use rakes and shovels to distribute it evenly, filling all corners and edges of the forms. A screed—a long straight board—levels the surface by dragging excess concrete toward the low spots. This creates a uniform thickness across the entire slab.
Finishing happens in stages as the concrete begins to set. A bull float smooths the surface and brings a thin layer of cement paste to the top. This step happens before water bleeds to the surface—finishing too early or working the surface too much weakens the concrete and can cause scaling problems later.
The final finish depends on your needs and preferences. A broom finish—dragging a stiff broom across the semi-set concrete—creates texture that provides traction in winter. This simple finish works well for Long Island driveways because it’s functional, durable, and doesn’t trap water. Decorative options like stamping or staining are available, but they add cost and require additional maintenance.
Control joints get cut or formed while the concrete is still workable. These planned weak points control where cracks form, keeping them straight and less noticeable. Joints typically run perpendicular to the driveway length at intervals no greater than 10 feet. Where the driveway meets your garage or sidewalk, isolation joints allow independent movement without transferring stress.
Curing begins immediately after finishing. The concrete needs to stay moist for at least seven days to develop full strength. Some contractors apply a curing compound that seals the surface and retains moisture. Others use wet burlap or periodic spraying with water. In hot weather, proper curing becomes even more critical—concrete that dries too quickly never reaches its potential strength.
The waiting period tests your patience but protects your investment. No vehicle traffic for seven days minimum. No heavy vehicles or parking large trucks for 30 days. No sealing for at least a month. Contractors who rush these timelines are sacrificing your driveway’s long-term performance to move on to the next job.
The contractor you choose matters more than the material you select. A skilled masonry company with local experience will deliver a concrete driveway that handles Long Island’s climate and lasts for decades. A budget contractor might use the same materials but skip the details that make the difference between success and failure.
Look for contractors with extensive experience in Nassau County and Suffolk County specifically. Long Island’s soil conditions, drainage challenges, and climate require local knowledge that contractors from other regions simply don’t have. Ask about their base preparation methods, reinforcement specifications, and how they handle drainage on properties similar to yours.
References and completed projects tell you more than advertising claims. Visit driveways the contractor installed 5-10 years ago. Look for cracks, settling, edge deterioration, and drainage problems. Talk to those homeowners about their experience—not just the final result, but how the contractor communicated, handled problems, and stood behind their work.
Written proposals should include specific details about excavation depth, base materials and thickness, concrete specifications, reinforcement type and placement, and the jointing plan. Vague proposals that just list square footage and price hide the details where quality varies most. A detailed proposal shows a contractor who understands the work and isn’t planning to cut corners.
Your driveway represents a significant investment in your property’s function, appearance, and value. When you work with a masonry company that understands Long Island’s specific challenges and has the experience to address them properly, you get a driveway that still looks great and performs well decades from now.
We bring over two decades of experience to concrete driveway installation throughout Suffolk County. If you’re ready to discuss your project and learn what proper installation looks like for your specific property, reach out to explore how a professionally installed concrete driveway can transform your home’s curb appeal while providing the durability Long Island’s climate demands.
Article details:
Share:
Continue learning: